
基于Ubuntu打包的rootfs进行修改
在http://cdimage.ubuntu.com/上下载打包好的Ubuntu的rootfs,需要使用armhf版本,我选用的是http://cdimage.ubuntu.com/ubuntu-base/releases/focal/release/ubuntu-base-20.04.4-base-armhf.tar.gz
解包时建议切换为root用户,这样符合一般操作系统的文件属性,否则部分目录比如/sys或者/tmp可能会因为owner id不一致导致出现Access Denied。以下所有操作除非特别说明,均使用root用户完成
在开发机上安装qemu-user-static,把/usr/bin/qemu-arm-static拷贝到rootfs下的usr/bin目录,这样就可以在开发机上直接运行rootfs内的二进制文件。
修改rootfs中的etc/resolv.conf,添加一行DNS服务器设置nameserver 210.28.129.251。
这只是临时措施,因为在开发板上启动后,DNS解析会被systemd接管,需要修改
/etc/systemd/resolved.conf文件。
chroot到rootfs所在的目录,开始进行配置:
- 使用
passwd root命令,设置root密码。 - 安装部分必要的软件:
apt install openssh-server ssh-askpass sudo vim nano net-tools iproute2 udhcpc iputils-ping build-essential apt-utils - 安装部分已知需要的库:
apt install iiod libad9361-dev libcjson-dev - (待完成)创建用户,并添加至sudoer
- 修改hostname和hosts:
echo "NJURadio" > /etc/hostname echo "127.0.0.1 localhost" >> /etc/hosts echo "127.0.1.1 NJURadio" >> /etc/hosts - 设置串口,修改
/lib/systemd/system/[email protected]文件,将BindsTo改为dev-%i,为ExecStart添加参数-a root - 修改
/etc/ssh/sshd_config,设置PermitRootLogin yes和PasswordAuthentication yes。 - 修改
/etc/systemd/resolved.conf,将DNS设置为210.28.129.251
从安全角度考虑,一般不设置root密码为好,需要使用root的时候一律使用sudo,root用户禁止直接登录,我这样做主要是偷懒。
glibc等库被build-essential包含,不用再额外装一遍
然后,把rootfs打包成ramdisk或者装载到NFS目录,在开发板上启动。
localip=192.168.3.27
remoteip=192.168.3.102
gwip=192.168.3.1
mask=255.255.255.0
nfsroot=/srv/nfs/zynq-ubuntu

modeboot=minaduki_netboot

tftpsetenv=setenv ipaddr ${localip}; setenv gatewayip ${gwip}; setenv netmask ${mask}; setenv serverip ${remoteip};
tftpgetimage=tftpboot 0x3000000 ${kernel_image}; tftpboot 0x2A00000 ${devicetree_image};

nfssetenv=setenv nfsargs nfsaddrs=${localip}:${remoteip}:${gwip}:${mask}
nfssetrootfs=setenv rootfs root=/dev/nfs rw nfsroot=${remoteip}:${nfsroot},vers=3

setbootargs=setenv bootargs console=ttyPS0,115200 $rootfs $nfsargs earlycon rootwait cpuidle.off=1

uenvcmd=run minaduki_netboot
minaduki_netboot=run tftpsetenv; run tftpgetimage; run nfssetenv; run nfssetrootfs; run setbootargs; bootm 0x3000000 - 0x2A00000;
Known Issues
- apt有权限问题,会报warning:W: Download is performed unsandboxed as root as file ‘/var/cache/apt/archives/partial/xxx.deb’ couldn’t be accessed by user ‘_apt’. – pkgAcquire::Run (13: Permission denied):尝试
chown _apt /var/cache/apt/archives/partial/,但好像没啥作用(但也没啥影响) - 内核似乎没有seccomp导致ntp不能用,时间有问题
设置一个启动脚本
不知道为什么,如果使用sd卡启动,则开机时网络有关的项目会报错,可能是因为一开始用的NFS启动所以没有察觉。
因为这些错误导致开机的时候不会尝试DHCP(NetworkManager这样的运行不起来),NTP也会fail,所以需要写一个自己的启动脚本
启动脚本直接使用/etc/rc.local执行:
#! /bin/bash
bash /root/myinit.sh
exit 0
脚本负责DHCP,然后从NTP获取时间:
#! /bin/bash
udhcpc -t 5 -n
ntpdate ntp.nju.edu.cn对于udhcpc,-t 5参数代表最多尝试发送5个DHCP Discover,-n则代表如果无法获取租约则退出程序。
对于ntpdate,如果失败会自动退出,不用管。
做个整合?
TBD
TODO
设计一个OTA更新的方案。
参考:ARM架构安装ubuntu系统
狗日的ubuntu dns设置
couldn’t be accessed by user ‘_apt’. – pkgAcquire::Run (13: Permission denied) [duplicate]
试试Debian
root执行:
apt install debootstrap binfmt-support
export TARGET_DIR=/media/minaduki/rootfs
export DISTRO=bullseye
mount -i -o remount,exec,dev ${TARGET_DIR} # 如果TARGET_DIR是SD卡的话
debootstrap --foreign --arch armhf ${DISTRO} ${TARGET_DIR}
cp /usr/bin/qemu-arm-static ${TARGET_DIR}/usr/bin
# echo "nameserver 210.28.129.251" >> ${TARGET_DIR}/etc/resolv.conf
echo "NJURadio" > ${TARGET_DIR}/etc/hostname
echo "127.0.0.1 localhost" >> ${TARGET_DIR}/etc/hosts
echo "127.0.1.1 NJURadio" >> ${TARGET_DIR}/etc/hosts
然后chroot:
chroot ${TARGET_DIR}
export DISTRO=bullseye
/debootstrap/debootstrap --second-stage
配置APT:
cat << EOT > /etc/apt/sources.list
deb https://mirror.nju.edu.cn/debian/ bullseye main contrib non-free
# deb-src https://mirror.nju.edu.cn/debian/ bullseye main contrib non-free
deb https://mirror.nju.edu.cn/debian/ bullseye-updates main contrib non-free
# deb-src https://mirror.nju.edu.cn/debian/ bullseye-updates main contrib non-free
deb https://mirror.nju.edu.cn/debian/ bullseye-backports main contrib non-free
# deb-src https://mirror.nju.edu.cn/debian/ bullseye-backports main contrib non-free
deb https://mirror.nju.edu.cn/debian-security bullseye-security main contrib non-free
# deb-src https://mirror.nju.edu.cn/debian-security bullseye-security main contrib non-free
EOT
cat << EOT > /etc/apt/apt.conf.d/71-no-recommends
APT::Install-Recommends "0";
APT::Install-Suggests "0";
EOT配置系统:
apt -o "Acquire::https::Verify-Peer=false" update
apt -o "Acquire::https::Verify-Peer=false" install ca-certificates
apt update
apt install locales dialog
dpkg-reconfigure locales
apt install openssh-server ntpdate resolvconf sudo less hwinfo ntp tcsh zsh ssh-askpass vim nano
apt install build-essential iiod libad9361-dev libcjson-dev
apt install tftp tftpd
passwd
net-tools iproute2 udhcpc iputils-ping
参考:GitHub – PyHDI/zynq-linux
InstallingDebianOnXilinxZC702wheezy
[Is it possible to have APT accept an \"invalid\" certificate?](https://unix.stackexchange.com/questions/317695/is-it-possible-to-have-apt-accept-an-invalid-certificate "Is it possible to have APT accept an \"invalid\" certificate?")
用ADI魔改
ADI最新的镜像采用了Debian buster作为rootfs(apt包竟然还有从树莓派偷的,真有你的ADI)。
2019_R2版镜像rootfs集成了很多功能,为了放进8G SD卡,所以把用flatpak装的SoapySDR的相关依赖都卸载了,反正用不太上。
APT换个源:
/etc/apt/sources.list
deb http://mirrors.nju.edu.cn/raspbian/raspbian/ buster main contrib non-free rpi
# Uncomment line below then 'apt-get update' to enable 'apt-get source'
#deb-src http://mirrors.nju.edu.cn/raspbian/raspbian/ buster main contrib non-free rpi
deb http://mirrors.nju.edu.cn/debian buster-backports main
/etc/apt/sources.list.d/raspi.list
deb http://mirror.nju.edu.cn/raspberrypi/debian/ buster main
# Uncomment line below then 'apt-get update' to enable 'apt-get source'
#deb-src http://mirror.nju.edu.cn/raspberrypi/debian/ buster main
重新配置locales:
dpkg-reconfigure locales装下tftpd和tftp,装下libcjson-dev
修改etc/fstab里的PARTUUID,可以使用sudo blkid在PC上查看
为了瘦身,apt autoremove libqt5*
改时区:timedatectl set-timezone Asia/Shanghai
tftpd-hpa有可能无法启动:是因为kernel没有ipv6支持,直接修改/etc/init.d/tftpd-hpa文件,定位到do_start()里面的
`        start-stop-daemon --start --quiet --oknodo --exec $DAEMON -- \
                --listen --user $TFTP_USERNAME --address $TFTP_ADDRESS \
$TFTP_OPTIONS $TFTP_DIRECTORY加入参数--ipv4,然后reload-daemon并重启服务即可。
结果启动时tftpd-hpa起不来,报错说cannot resolve local IPv4 bind address: 0.0.0.0, Name or service not known,看起来像是因为Network还没起来,但是不应该如此,因为kernel已经提示Reached target Network is Online了。
暂时在rc.local里面加了句sleep 10; systemctl restart tftpd-hpa来规避这个问题。
Busybox
结果老王视察的时候指出了一个比较严重的问题:
目前的ADI系统和全部unminimize的Ubuntu用的是很爽,但是占用空间还是太大了,ADI的整套系统删去几个GUI的组件后还是有5.1GiB的大小,而最终系统上可能顶多也就1-2GiB的nand可用,是不足以装下整套的。
而且另一方面,使用发行版rootfs其实也有一定的取巧成分,实质上是借用包管理系统以简化了调试的时候装包的步骤,实现偷懒的目的。但是生产环境中依赖项目应该都已经准备完成了,而且为了安全考虑也不需要开放特别多的接口或者提供很强的拓展性,所以尝试用busybox做一个生产环境的rootfs。
SD卡布局
暂时划分为三个分区。
第一个分区为FAT,大小50MiB,存储启动用的BOOT.bin、设备树、内核、uBoot环境。
第二个分区为ext4,大小500MiB,存储根文件系统,大小可能会进一步压缩。
第三个分区为ext4,大小为剩余的空间,存储用户程序和数据。
编译
先checkout到当前最新的origin/1_35_stable分支,然后make defconfig加载默认配置。
使用make menuconfig修改部分配置,我修改了
Settings ->
    Build static libraray (no shared libs) = Y
    Cross compiler prefix=arm-linux-gnueabihf-
Coreutils ->
    Support %[num]N nanosecond format specifier = Y
Init Utilities ->
    Be quiet on boot (no 'init started:' message) = N
Linux System Utilities ->
    Support mount helpers = Y # 说来这里同时启用了UUID mount但是在fstab里没法用UUID挂载,之后有空研究下
Networking Utilities ->
    Verbose resolution errors = Y
Support /etc/networks = Ymake,提示需要这些库:
Static linking against glibc, can't use --gc-sections
Trying libraries: crypt m resolv rt
 Library crypt is not needed, excluding it
 Library m is needed, can't exclude it (yet)
 Library resolv is needed, can't exclude it (yet)
 Library rt is not needed, excluding it
 Library m is needed, can't exclude it (yet)
 Library resolv is needed, can't exclude it (yet)
Final link with: m resolv
根据提示,至少应该把libm和libresolv两个库准备好(我之前一次忘记了libresolv),以便下一步拷贝到rootfs上,我选择顺手带上libc,另外根据方老师之前的资料,把ld-linux-armhf.so.3也带上。
sudo make install,生成rootfs。
基本配置
将生成的rootfs拷贝到SD卡或者ramdisk中,仿照PC的根目录,创建缺少的目录,并调整权限:
total 68
drwxr-xr-x 17 root     root     4096 Apr 29 18:41 ./
drwxrwxr-x 38 minaduki minaduki 4096 Apr 29 18:27 ../
drwxr-xr-x  2 root     root     4096 Apr 29 18:27 bin/
drwxr-xr-x  2 root     root     4096 Apr 29 18:32 boot/
drwxr-xr-x  2 root     root     4096 Apr 29 18:31 dev/
drwxr-xr-x  2 root     root     4096 Apr 29 18:31 etc/
drwxr-xr-x  2 root     root     4096 Apr 29 18:32 home/
lrwxrwxrwx  1 root     root        7 Apr 29 18:41 lib -> usr/lib/
lrwxrwxrwx  1 root     root       11 Apr 29 18:27 linuxrc -> bin/busybox*
drwxr-xr-x  2 root     root     4096 Apr 29 18:32 mnt/
drwxr-xr-x  2 root     root     4096 Apr 29 18:32 opt/
dr-xr-xr-x  2 root     root     4096 Apr 29 18:32 proc/
drwx------  2 root     root     4096 Apr 29 18:32 root/
drwxr-xr-x  2 root     root     4096 Apr 29 18:32 run/
drwxr-xr-x  2 root     root     4096 Apr 29 18:27 sbin/
dr-xr-xr-x  2 root     root     4096 Apr 29 18:31 sys/
drwxrwxrwt  2 root     root     4096 Apr 29 18:31 tmp/
drwxr-xr-x  5 root     root     4096 Apr 29 18:40 usr/
drwxr-xr-x  2 root     root     4096 Apr 29 18:32 var/
库文件
根据上一步的需求,将需要的库文件放入/usr/lib目录下即可。
后续需要的其他库文件也放到此处。
用
readelf -d命令查看需要的库。
NJURadio当前需要:libpthread.so.0、libcjson.so.1、libstdc++.so.6、libm.so.6、libgcc_s.so.1、libc.so.6。
设备文件
在/dev目录下创建三个必要的设备文件:
mknod console c 5 1
mknod null c 1 3
mknod zero c 1 5
其他的设备文件将使用fstab和mdev工具自动生成。
配置文件
初始化表
创建/etc/inittab文件,并输入以下内容:
::sysinit:/etc/init.d/rcS
::askfirst:-/bin/sh
::once:/usr/sbin/telnetd -l /bin/login
::ctrlaltdel:/sbin/reboot
::shutdown:/bin/umount -a -r
文件系统表
创建/etc/fstab文件,并输入以下内容:
proc            /proc           proc    defaults        0       0
tmpfs       /tmp        tmpfs   defaults    0   0
sysfs       /sys        sysfs   defaults    0   0
mdev        /dev        tmpfs   defaults    0   0
/dev/mmcblk0p1  /boot           vfat    defaults          0       2
/dev/mmcblk0p2  /               ext4    defaults,noatime  0       1
/dev/mmcblk0p3  /nju            ext4    defaults,noatime  0       3
Message Of ToDay
创建/etc/motd文件,并输入自定义的个性化内容。
Run Command
创建/etc/rc文件,授予执行权限,并输入以下内容:
#! /bin/sh
hostname NJURadio

mount -a
echo /sbin/mdev > /proc/sys/kernel/hotplug
mdev -s
mkdir -p /dev/pts
mkdir -p /dev/i2c
mount -t devpts devpts /dev/pts

cat /etc/motd将此文件软链接到/etc/init.d/rcS。
环境文件
创建/etc/profile文件,并输入以下内容:
alias ll='ls -al'
# 其他待定参考:Understanding a little more about /etc/profile and /etc/bashrc
Linux busybox mount -a fstab – zengjf – 博客园
(原创)一步一步学ZedBoard & Zynq(七):制作ZedBoard上linux根文件系统(ramdisk) – 超群天晴 – 博客园
BusyBox制作根文件系统_陈伙子的博客-CSDN博客_busybox制作根文件系统
BusyBox rcS&fstab配置
增添基本功能
开机自动DHCP和NTP
在/etc/rc合适位置加入:
ifconfig lo up
ifconfig eth0 up
udhcpc -t 5 -n # -t 5最多尝试发送5个DHCP Discover,-n如果无法获取租约则放弃
ntpd -dnNq # d啰嗦,n强制前台,N高优先级,q同步完成就退出udhcp本身不能完成网络的配置,而是调用/usr/share/udhcpc/default.script这个脚本进行,所以要创建该脚本,不要忘了授予执行权限:
#!/bin/sh
[ -z "$1" ] && echo "Error: should be called from udhcpc" && exit 1

RESOLV_CONF="/etc/resolv.conf"
[ -n "$broadcast" ] && BROADCAST="broadcast $broadcast"
[ -n "$subnet" ] && NETMASK="netmask $subnet"

case "$1" in
  deconfig)
    /sbin/ifconfig $interface 0.0.0.0
    ;;

  renew|bound)
    /sbin/ifconfig $interface $ip $BROADCAST $NETMASK

    if [ -n "$router" ] ; then
      echo "deleting routers"
      while route del default gw 0.0.0.0 dev $interface ; do
        :
      done

      for i in $router ; do
        route add default gw $i dev $interface
      done
    fi

    echo -n > $RESOLV_CONF
    [ -n "$domain" ] && echo search $domain >> $RESOLV_CONF
    for i in $dns ; do
      echo adding dns $i
      echo nameserver $i >> $RESOLV_CONF
    done
    ;;
esac

exit 0
nslookup正常工作,但是其他ping或者wget这样的命令报错bad address:
似乎是缺少libnss和libresolv的缘故,拷过来就好了。(有可能只是缺少libresolv,因为我之前忘记拷过来了)
ntpd可以使用-p <server>参数指定NTP服务器,也可以在/etc/ntp.conf中设置:
server ntp.nju.edu.cn参考:基于DHCP建立嵌入式Linux开发环境
嵌入式 ARM 板子 Busybox 域名解析失败
BUG:nslookup能通,但ping不通域名
Linux busybox-ntpd的启动方式_小金king的博客-程序员秘密_busybox ntpd
ntp.conf配置文件详解
tftpd
Busybox提供的tftpd可以通过udpsvd或者inetd启用,这里选择使用inetd,将配置写入/etc/inetd.conf:
69 dgram udp nowait root tftpd tftpd -c -l /srv/tftpinted需要提供运行程序的用户名,而busybox默认是没有/etc/passwd文件的,因此先手动创建一个:
root:x:0:0:root:/root:/bin/sh用passwd命令设个密码。
最后,把启动inetd的命令加入/etc/rc,实现开机自动启动。
busybox的tftpd仅支持binary模式,而且已知与部分tftp程序不兼容,在PC上执行tftp get时会提示
Error code 0: malformed packet,不过上传没有问题。
已知不兼容的tftp有:Ubuntu发行版的tftp-hpa包、macOS的tftp命令行工具、Windows 11的tftp命令行工具。
经测试可以正常工作的tftp有:Ubuntu发行版的tftp包、busybox的tftp。
可以通过PC上开tftpd的方式规避bug,或者采用其他方式传输文件。
ZModem
由于没有tftp有一定的兼容性问题,所以需要一个兼容性较好的手段来传输文件,我的打算是用ZModem和scp来实现,scp基于SSH,需要移植OpenSSL等更多的依赖,所以先从简单的ZModem开始。
Busybox其实内置了XModem接收文件的功能,但是不能发送文件,而tftp的兼容性主要就出现在从板子到PC发送文件上,因此,我选择了移植lrzsz。
移植的时候我分别尝试了两种方式,这两种方式都可以实现目的,但是过程略有不同。
QEMU编译
直接chroot到之前准备好的Ubuntu rootfs,然后configure并make就行。
目标二进制lsz和lrz在src/目录下,拷贝到板子上即可。
交叉编译
CC=arm-linux-gnueabihf-gcc ./configure --cache-file=./arm-linux-gnueabihf.cache --host=arm-linux-gnueabihf --build=arm-linux-gnueabihf
make目标二进制lsz和lrz在src/目录下,拷贝到板子上即可,另外,这两个二进制依赖于libnsl.so.1,所以这个链接库也要添加。
思考:由于我是先测试的QEMU编译的结果,再测试的交叉编译的结果,所以发现前者并不需要
libnsl.so.1,后者才需要。
用readelf查看后,发现虽然前置不需要libnsl.so.1,但是却需要ld-linux-armhf.so.3,只是这个已经提前移植了。
可能是因为configure的时候会根据是否为交叉编译进行相应的配置?另外ld-linux-armhf.so.3作为interpreter到底起到了什么作用?
SSH
Dropbear SSH是一个简单轻量,依赖很少的SSH服务端,常用于嵌入式系统。
Dropbear SSH依赖于zlib,先进行zlib的编译:
prefix=./install CC=arm-linux-gnueabihf-gcc CFLAGS="-static -fPIC" ./configure
make
make install
然后编译Dropbear:
CC=arm-linux-gnueabihf-gcc ./configure --prefix=`pwd`/install --with-zlib=`pwd`/../zlib-1.2.12/install --host=arm --enable-static
make
make install
如果想在板子上用
scp,可以make scp然后把源码目录里的scp二进制拷到板子上。
将生成的文件拷贝上板,进行后续配置:
mkdir /etc/dropbear
dropbearkey -t rsa -f /etc/dropbear/dropbear_rsa_host_key
dropbearkey -y -f /etc/dropbear/dropbear_rsa_host_key | grep "^ssh-rsa " >> /etc/dropbear/authorized_keys我选择使用inetd管理dropbear,向/etc/inetd.conf添加一条:
22 stream tcp nowait root dropbear dropbear -i # -i意为Start for inetd这样就可以通过SSH连接板子,并用scp传输文件了。
参考:External Tiny Utilities – Busybox
Dropbear SSH
交叉编译轻量级Dropbear SSH
ELS Howto: Dropbear SSH
OpenSSL
由于项目部分代码使用了Python,所以需要移植Python,因此首先移植OpenSSL。
./Configure linux-armv4 --cross-compile-prefix=arm-linux-gnueabihf- --prefix=`pwd`/install
make
make installOpenSSL需要libdl.so.2,需要拷贝过来。c_rehash命令是Perl脚本,和编译的时候配置的prefix有关,而且目前不需要,所以没有拷贝。
测试:可以用openssl speed命令测试一下是否成功移植,这个程序是测试速度的,不过能运行能用就好,速度不重要。
说来现在用的OpenSSL 1.1.1n似乎快结束支持了,官方好像推了个新的OpenSSL 3.0系列,改天升级下。
OpenSSL 3.0
./Configure linux-armv4 --cross-compile-prefix=arm-linux-gnueabihf- --prefix=`pwd`/install
make
make install新增加了一个依赖libatomic.so.1。
Python
TBD.
Python的交叉编译需要编译机有同样版本的Python,部分文章声称只要版本更高就行,但部分文章说要exactly the same,所以我还是选择相同的版本。通常的做法是先本机编译安装,再交叉编译,但是我是懒狗,所以我选了和我系统Python一样的版本:3.8.10。
CC=arm-linux-gnueabihf-gcc CXX=arm-linux-gnueabihf-g++ AR=arm-linux-gnueabihf-ar RANLIB=arm-linux-gnueabihf-ranlib ./configure --host=arm-linux-gnueabihf --build=x86_64-linux-gnu --target=arm-linux-gnueabihf --enable-shared --disable-ipv6 --with-system-ffi ac_cv_file__dev_ptmx=yes ac_cv_file__dev_ptc=no --enable-optimizations --prefix=`pwd`/install --with-zlib=`pwd`/../zlib-1.2.12/install --with-openssl=`pwd`/../openssl-3.0.2/install
更多待定功能
似乎Buildroot也挺有前途的。
TBD.
Feature Request
开机自动进入console
只需要把/etc/inittab中的::askfirst:-/bin/sh条目改为::respawn:-/bin/sh即可。
参考:linux开机自启动,去掉“Please press Enter to activate this console“
库文件与程序移植
ADI相关
ADI官方的IIO(0.19.0版本)至少需要libiio.so.0、libad9361.so.0、libusb-1.0.so.0、librt.so.1、libavahi-client.so.3、libavahi-common.so.3、libxml2.so.2、libudev.so.1、libdbus-1.so.3、libdl.so.2、libicui18n.so.63、libicuuc.so.63、libicudata.so.63、libz.so.1、liblzma.so.5、bsystemd.so.0。
libsystemd.so.0怎么办
二进制都在/usr/bin和/usr/sbin下。
TBD.
Buildroot
配置
可以使用zynq_zed_defconfig或者zynq_zc706_defconfig作为基础,这两个的区别都在于内核的配置,但是反正我们不用他的内核,所以没什么关系。
我用的是zc706的。
配置项目有:
Toolchain ->
    Toolchain type = External toolchain
    Toolchain = Linaro ARM 2018.05
    Toolchain origin = Toolchain to be downloaded and installed
System configuretion ->
    System hostname = NJURadio
    System banner = Whatever you like
    /dev management = Dynamic using devtmpfs + mdev # 据说mdev比udev更适合嵌入式,先试试
    Use symlinks to /usr for /bin, /sbin and /lib = Y
    root password = nju
    /bin/sh = zsh
    Network interface to configure through DHCP = eth0
    Locales to keep = C en_US zh_CN
    Install timezone info = Y
    default local time = Asia/Shanghai
    Custom scripts to run = 全部置空
Kernel->
    Linux Kernel = N
Target packages->
    Show packages that are also provided by busybox = Y
    Compressors and decompressors ->
        zip = Y
    Filesystem and flash utilities ->
        mmc-utils = Y
        mtd, jffs2 and ubi/ubifs tools = Y
        nfs-utils = Y
        NFSv4/NFSv4.1 = Y
        squashfs = Y
    Interpreter languages and scripting ->
        python3 = Y
        core python3 modules ->
            全部
        External python modules ->
            python-pip = Y
    Libraries ->
        Crypto ->
            CA Certificate = Y
        Hardware handling ->
            libiio = 有关的全选
        JSON/XML ->
            cJSON = Y
    Networking applications ->
        dropbear = Y
        iptables = Y
        iptuils = Y
        lrzsz = Y
        nginx = Y
        ntp = Y
        traceroute = Y
        wget = Y
    Shell and utilities ->
        zsh = Y
    System tools ->
        kmod = Y
        kmod utilities = Y
            utils-linux ->
                chfn/chsh = Y
    Text editors and viewers ->
        nano = Y
Bootloaders ->
    U-boot = N
报错:You seem to have the current working directory in your LD_LIBRARY_PATH environment variable. This doesn’t work.
注释掉~/.bashrc里面自己设置的LD_LIBRARY_PATH即可。
按照手册说明,添加Python模块后要手动重新build python,不能make。(所以不如直接make clean all)
参考:Buildroot – Making Embedded Linux Easy
Build Linux for Zynq-7000 AP SoC using Buildroot
Linux下udev和mdev详解
Cross-Compiler and Buildroot · Issue #34 · abhiTronix/raspberry-pi-cross-compilers · GitHub
Buildroot: change default root shell – StackOverflow
自定义
编译时配置
串口自动登录、motd、profile、fstab。
需要一个脚本文件post_fakeroot_script.sh,并设置System configuration -> Custom scripts to run inside the fakeroot environment为该脚本。
另外需要准备一个fstab_patch文件,保存需要额外添加的fstab条目,一个mymotd文件,保存自定义的motd。
对于post_fakeroot_script.sh:
#! /bin/sh

# Modify the inittab to enable serial auto-login
sed -i 's/ttyPS0\:\:respawn\:\/sbin\/getty -L  ttyPS0 0 vt100/ttyPS0\:\:respawn\:\-\/bin\/zsh/g' ${TARGET_DIR}/etc/inittab

# Customize motd
cp /home/minaduki/SD_IMG_Proj/buildroot/mymotd ${TARGET_DIR}/etc/motd
echo "cat /etc/motd" >> ${TARGET_DIR}/etc/init.d/rcS

# Customize /etc/profile
echo "alias ll=\"ls -alF\"" >> ${TARGET_DIR}/etc/profile

# Customize bashrc
#echo "source /etc/profile" >> ${TARGET_DIR}/.bashrc
#echo "export PS1='[\u@\h \W] \$ '" >> ${TARGET_DIR}/.bashrc
#echo "source /etc/profile" >> ${TARGET_DIR}/root/.bashrc
#echo "export PS1='[\u@\h \W] \$ '" >> ${TARGET_DIR}/root/.bashrc

# Customize /etc/zshrc
echo "source /etc/profile" >> ${TARGET_DIR}/etc/zshrc
echo "export PS1='[%n@%m %1~] %# '" >> ${TARGET_DIR}/etc/zshrc

# Add fstab entries
mkdir ${TARGET_DIR}/boot
mkdir ${TARGET_DIR}/nju
mkdir ${TARGET_DIR}/nfs
cat /home/minaduki/SD_IMG_Proj/buildroot/fstab_patch >> ${TARGET_DIR}/etc/fstab对于fstab_patch:
# <file system>   <mount pt>    <type>    <options> <dump>    <pass>
/dev/mmcblk0p1  /boot       vfat    defaults    0   2
/dev/mmcblk0p4  /nju        ext4    defaults,noatime 0  2
192.168.3.102:/srv/nfs /nfs nfs defaults,noauto 0 0参考:The buildroot user manual
buildroot根文件系统设置root用户自动登录方法
Linux sed 命令 | 菜鸟教程
MacOS下禁止开机自动挂载分区 [/etc/fstab]
How to Customize the zsh Prompt in the macOS Terminal
将busybox系统作为备用系统
当前SD卡布局如下:
第一个分区为FAT,大小50MiB,存储启动用的BOOT.bin、设备树、内核、uBoot环境。
第二个分区为ext4,大小500MiB,存储busybox根文件系统,用于rootfs更新和救援。
第三个分区为ext4,大小500MiB,存储buildroot根文件系统,是主文件系统。
第四个分区为ext4,大小为剩余的空间,存储用户程序和数据。
uEnv.txt配置如下:
modeboot=minaduki_sdboot
uenvcmd=run minaduki_sdboot

adi_sdboot=echo Copying Linux from SD to RAM... && fatload mmc 0 0x3000000 ${kernel_image} && fatload mmc 0 0x2A00000 ${devicetree_image} && if fatload mmc 0 0x2000000 ${ramdisk_image}; then bootm 0x3000000 0x2000000 0x2A00000; else bootm 0x3000000 - 0x2A00000; fi
bootargs=console=ttyPS0,115200 root=/dev/mmcblk0p2 rw earlycon rootfstype=ext4 rootwait cpuidle.off=1

localip=192.168.3.27
remoteip=192.168.3.102
gwip=192.168.3.1
mask=255.255.255.0
nfsroot=/srv/nfs/zynq-ubuntu

tftpsetenv=setenv ipaddr ${localip}; setenv gatewayip ${gwip}; setenv netmask ${mask}; setenv serverip ${remoteip};
tftpgetimage=tftpboot 0x3000000 ${kernel_image}; tftpboot 0x2A00000 ${devicetree_image};

nfssetenv=setenv nfsargs nfsaddrs=${localip}:${remoteip}:${gwip}:${mask}
nfssetrootfs=setenv rootfs root=/dev/nfs rw nfsroot=${remoteip}:${nfsroot},vers=3

setbootargs=setenv bootargs console=ttyPS0,115200 $rootfs $nfsargs earlycon rootwait cpuidle.off=1

minaduki_netboot=run tftpsetenv; run tftpgetimage; run nfssetenv; run nfssetrootfs; run setbootargs; bootm 0x3000000 - 0x2A00000;

set_minaduki_sdboot_bootargs=setenv bootargs console=ttyPS0,115200 root=/dev/mmcblk0p3 rw earlycon rootfstype=ext4 rootwait cpuidle.off=1
minaduki_sdboot=run set_minaduki_sdboot_bootargs; run adi_sdboot;

minaduki_rescue=run adi_sdboot
添加Python modules
由于板上没有任何编译器,所以不可能用pip安装,必须要在buildroot里面添加包。
在Buildroot用户手册的18.9.3节提到,可以使用utils目录下的scanpypi程序,添加PyPI上的包到buildroot。
以添加pyadi-iio包为例:
conda create -n buildroot python=3.10 setuptools
conda activate buildroot
pip install six spdx_lookup
./utils/scanpypi pyadi-iio -o package有报错RuntimeError: Unrecognized setuptools command: ['pyadi-iio', '-o', 'package']不用管,似乎不影响。
然后,修改package/Config.in,在menu "External python modules"下添加:
comment "Extra python packages added by MINADUKI"
source 'package/python-pyadi-iio/Config.in
source 'package/python-pylibiio/Config.in
最后,在menuconfig上勾上python-pyadi-iio和提示的依赖pylibiio与numpy,重新make即可。
安装项目需要的Python modules
目前的项目有一份利用setup.py自动安装的脚本,从脚本中可以提取当前需要的Python包如下:
- setuptools-39.1.0
- pip-8.0.2
- Werkzeug-1.0.1
- itsdangerous-1.1.0
- pytz-2015.7
- MarkupSafe-1.1.1
- Babel-2.9.1
- Jinja2-2.11.1
- wtf-0.1
- WTForms-2.3.3
- click-7.1.2
- Flask-1.1.2
- flask-blueprint-1.3.0
- Flask-Login-0.5.0
- Flask-WTF-0.14.3
所有包的对应关系如下表:
| 原始包名 | 原始版本 | 对应PyPI软件包 | PyPI版本 | 对应buildroot内package | 备注 |
|---|---|---|---|---|---|
| setuptools-39.1.0 | 39.1.0 | setuptools | 62.1.0 | python-setuptools | PyPI |
| pip-8.0.2 | 8.0.2 | pip | 22.0.4 | python-pip | PyPI 未放入开发板rootfs |
| Werkzeug-1.0.1 | 1.0.1 | Werkzeug | 2.1.2 | python-werkzeug | PyPI |
| itsdangerous-1.1.0 | 1.1.0 | itsdangerous | 2.1.2 | python-itsdangerous | PyPI |
| pytz-2015.7 | 2015.7 | pytz | 2022.1 | python-pytz | PyPI |
| MarkupSafe-1.1.1 | 1.1.1 | MarkupSafe | 2.1.1 | python-markupsafe | PyPI |
| Babel-2.9.1 | 2.9.1 | Babel | 2.10.1 | python-babel | PyPI |
| Jinja2-2.11.1 | 2.11.1 | Jinja2 | 3.1.2 | python-jinja2 | PyPI |
| wtf-0.1 | 0.1 | wtf | 0.1 | 自制 | PyPI |
| WTForms-2.3.3 | 2.3.3 | WTForms | 3.0.1 | python-wtforms | PyPI |
| click-7.1.2 | 7.1.2 | click | 8.1.3 | python-click | PyPI |
| Flask-1.1.2 | 1.1.2 | Flask | 2.1.2 | python-flask | PyPI |
| flask-blueprint-1.3.0 | 1.3.0 | flask-blueprint | 1.3.0 | 自制 | PyPI |
| Flask-Login-0.5.0 | 0.5.0 | Flask-Login | 0.6.1 | python-flask-login | PyPI |
| Flask-WTF-0.14.3 | 0.14.3 | Flask-WTF | 1.0.1 | python-flask-wtf | PyPI |
wtf和flask-blueprint虽然没有被buildroot收录,但是都可以从PyPI中取得,所以使用scanpypi添加即可。
conda activate buildroot
./utils/scanpypi wtf flask-blueprint -o package然后,修改package/Config.in,在menu "External python modules"下添加:
source 'package/python-wtf/Config.in
source 'package/python-flask-blueprint/Config.in
最后,在menuconfig上勾上需要的所有包,并make。
Bugfix
iio并不能正常工作,比如iio_info -s报错Scanning for IIO contexts failed: Input/output error (5)
可能需要mdevd
iio
在新版本中加入了udev,同时WJZ编译的FPGA文件中重新加入了所有的ADI原有的IP核,但是更改了部分数据的内容,用于感知功能,现在iio_info -s已经能正确返回数据了。
但是,在导入Python包import adi时,会报错:
>>> import adi
Traceback (most recent call last):
  File "<stdin>", line 1, in <module>
  File "/usr/lib/python3.9/site-packages/adi/__init__.py", line 34, in <module>
    from adi.ad936x import ad9361, ad9363, ad9364, Pluto
  File "/usr/lib/python3.9/site-packages/adi/ad936x.py", line 34, in <module>
    from adi.context_manager import context_manager
  File "/usr/lib/python3.9/site-packages/adi/context_manager.py", line 34, in <module>
    import iio
  File "/usr/lib/python3.9/site-packages/iio.py", line 229, in <module>
    _get_backends_count = _lib.iio_get_backends_count
  File "/usr/lib/python3.9/ctypes/__init__.py", line 387, in __getattr__
    func = self.__getitem__(name)
  File "/usr/lib/python3.9/ctypes/__init__.py", line 392, in __getitem__
    func = self._FuncPtr((name_or_ordinal, self))
AttributeError: python: undefined symbol: iio_get_backends_count但是我手动使用ctypes.cdll.LoadLibrary("libiio.so")函数加载libiio库,却能正常调用iio_get_backends_count函数使用,检查/usr/lib/python3.9/site-packages/iio.py,发现相关语句在227行:
_lib = _cdll(find_library(_iiolib), use_errno=True, use_last_error=True)因此推测可能是find_library函数没有找到应该有的链接库文件导致的,简单尝试一下,果然:
>>> from ctypes.util import find_library
>>> print(find_library("iio"))
None
>>> print(find_library("c"))
None连libc都找不到,查阅官方手册,得知find_library函数是通过调用外部程序(/sbin/ldconfig,gcc,objdump以及ld) 来寻找库文件的,而开发板上并没有这些程序,所以自然只能返回None。
鉴于向开发板上移植ldconfig程序比较复杂(其实就是暂时没想好怎么弄),我决定先手动指定文件名,修改iio.py:
_lib = _cdll("libiio.so", use_errno=True, use_last_error=True)这样可以暂时解决找不到库文件的问题,就可以正常导入PyADI包。
另外,在导入包后,似乎无法直接使用sdr = adi.ad9361()的方法自动搜索后端从而创建设备,必须手动指定uri,比如sdr = adi.ad9361("ip:127.0.0.1")就可以正常工作。
神秘网络包
伟大的鲁院士反馈了一个问题,在安装了自定义的网卡驱动后,有应用程序会偷偷用这个网卡vnet0发包,导致会弹出错误提示,希望能够查一下原因。
鲁院士给出的线索如下:
目前有两个设备,MAC末尾分别为68和69,
对于68:
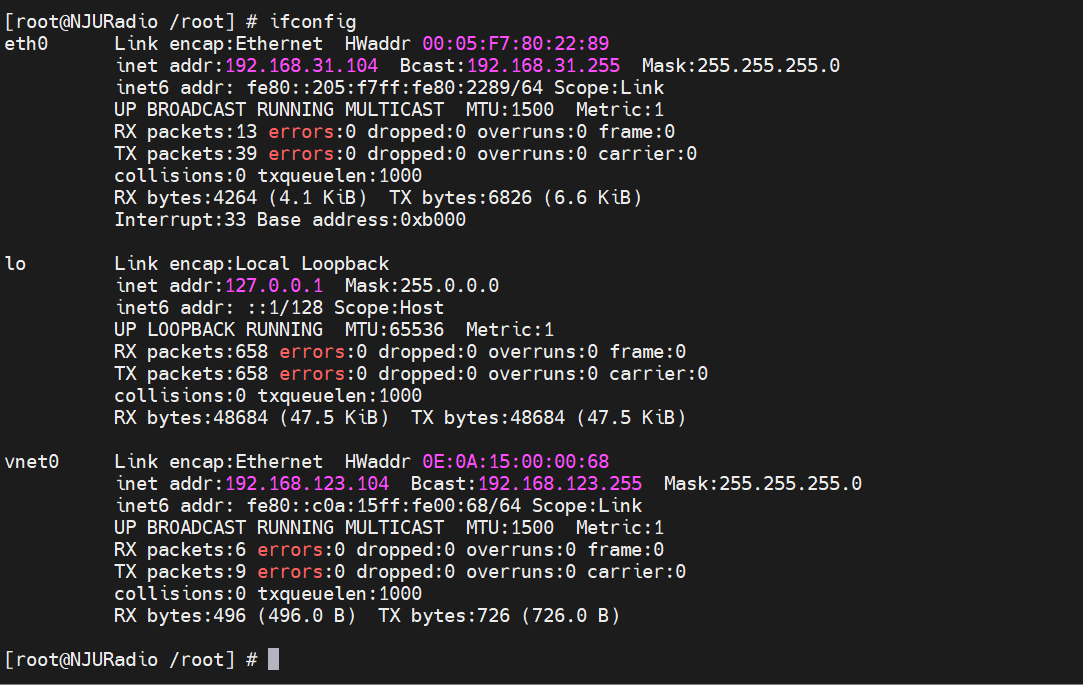
发送的“流氓帧”内容为:
3333000000020E0A1500006886DD6000000000103AFFFE800000000000000C0A15FFFE000068FF0200000000000000000000000000028500384A0000000001010E0A15000068对于69:
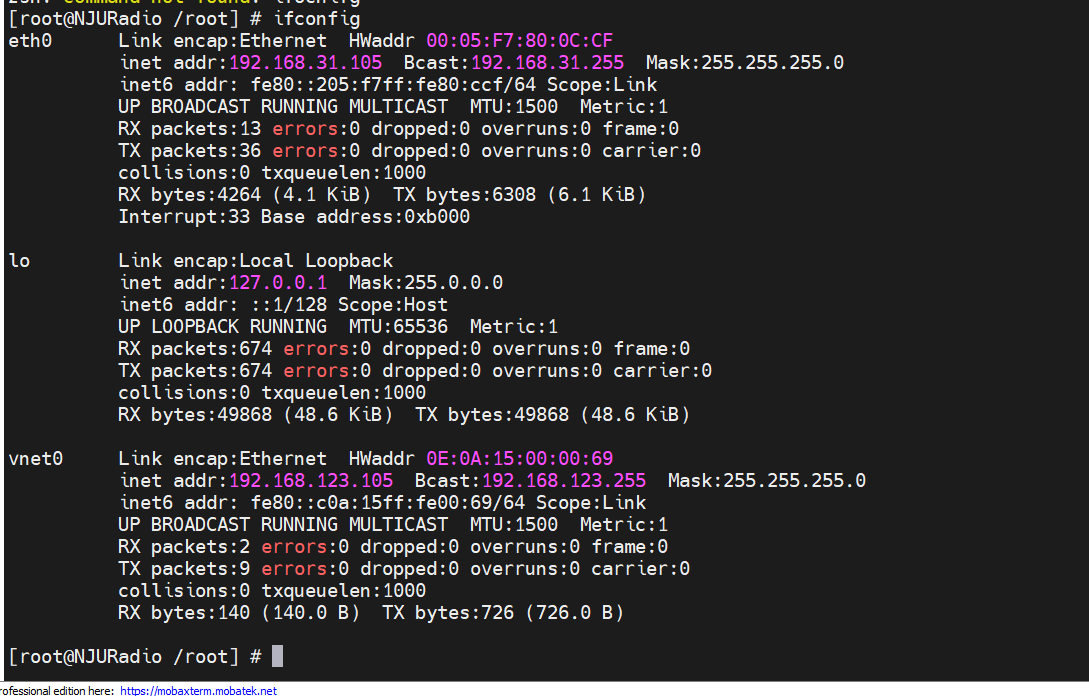
发送的“流氓帧”内容为:
3333000000020E0A1500006986DD6000000000103AFFFE800000000000000C0A15FFFE000069FF020000000000000000000000000002850038480000000001010E0A15000069另外,院士还提供了一个正常发送的帧,是由68ping69产生的:
0E0A150000690E0A150000680800450000541B9A40004001A6ECC0A87B68C0A87B69080003756BF90002AA000000E98B0A0008090A0B0C0D0E0F101112131415161718191A1B1C1D1E1F202122232425262728292A2B2C2D2E2F3031323334353637由于帧的内容是字符串,有点难以辨认,所以先转成二进制再用hexdump工具打开,会好辨认一些。
import binascii

str = '3333000000020E0A1500006886DD6000000000103AFFFE800000000000000C0A15FFFE000068FF0200000000000000000000000000028500384A0000000001010E0A15000068'

bin = binascii.a2b_hex(str)
with open("68.bin", "wb") as f:
    f.write(bin)
分析ping.bin:
  Offset: 00 01 02 03 04 05 06 07 08 09 0A 0B 0C 0D 0E 0F
00000000: 0E 0A 15 00 00 69 0E 0A 15 00 00 68 08 00 45 00    .....i.....h..E.
00000010: 00 54 1B 9A 40 00 40 01 A6 EC C0 A8 7B 68 C0 A8    .T..@.@.&l@({h@(
00000020: 7B 69 08 00 03 75 6B F9 00 02 AA 00 00 00 E9 8B    {i...uky..*...i.
00000030: 0A 00 08 09 0A 0B 0C 0D 0E 0F 10 11 12 13 14 15    ................
00000040: 16 17 18 19 1A 1B 1C 1D 1E 1F 20 21 22 23 24 25    ...........!"#$%
00000050: 26 27 28 29 2A 2B 2C 2D 2E 2F 30 31 32 33 34 35    &'()*+,-./012345
00000060: 36 37                                              67
各部分分析如下:
- Ethernet II 帧头:
0E 0A 15 00 00 69:目标MAC
0E 0A 15 00 00 68:源MAC
08 00:类型为IPv4 - IPv4 包头:
4:0100=IPv4
5:0101=头长度为5(20字节)
00:Differentiated Services Field: 0x00 (DSCP: CS0, ECN: Not-ECT)
00 54:总长84
1B 9A:ID:7066
40 00:Don’t fragment
40:TTL=64
01:协议ICMP
A6 EC:包头checksum
C0 A8 7B 68:源IP=192.168.123.104
C0 A8 7B 69:目标IP=192.168.123.105
后续为Payload。
分析68.bin:
  Offset: 00 01 02 03 04 05 06 07 08 09 0A 0B 0C 0D 0E 0F
00000000: 33 33 00 00 00 02 0E 0A 15 00 00 68 86 DD 60 00    33.........h.]`.
00000010: 00 00 00 10 3A FF FE 80 00 00 00 00 00 00 0C 0A    ....:.~.........
00000020: 15 FF FE 00 00 68 FF 02 00 00 00 00 00 00 00 00    ..~..h..........
00000030: 00 00 00 00 00 02 85 00 38 4A 00 00 00 00 01 01    ........8J......
00000040: 0E 0A 15 00 00 68 .....h- Ethernet II 帧头:
33 33 00 00 00 02:目标MAC
0E 0A 15 00 00 68:源MAC
86 DD:类型为IPv6
其实查到这里基本上就已经可以结束了,毕竟是IPv6的问题的话就把内核IPv6的支持关了就行了,这个目标MAC似乎是一个用于IPv6邻居发现的组播MAC,反正项目用不上IPv6,直接在内核里面关掉IPv6的支持就行。
- IPv6包头
6:0110=IPv6
0 0:Traffic Class: 0x00 (DSCP: CS0, ECN: Not-ECT)
0 00 00:流表=0x00000
00 10:Payload长度=16
3A:下一个Header=查询RF790为Unassigned
FF:跳数限制=255
FE 80 00 00 00 00 00 00 0C 0A 15 FF FE 00 00 68:源IP
FF 02 00 00 00 00 00 00 00 00 00 00 00 00 00 02:目标IP,这是IPv6的组播IP,代表所有的路由器
目标IP再一次佐证了我们的判断。
参考:6.9 编码和解码十六进制数 — python3-cookbook 3.0.0 文档
用 Python 向文件写入字节 | D栈 – Delft Stack
Ethernet
https://www.ietf.org/rfc/rfc791.txt
https://datatracker.ietf.org/doc/html/rfc790
IPv6 Neighbor Discovery
https://www.ietf.org/rfc/rfc2460.txt
ipv6的一些特殊地址_cybertan的博客-CSDN博客_ff02::16